A DIYer's Guide to Flawless Walls: Mastering the Paint Roller
Think painting a room is just slapping some color on a wall? Think again. The difference between a DIY disaster and a pro finish is all in the roller... and how you use it. Let's get rolling.
Choosing Your Weapon... The Roller
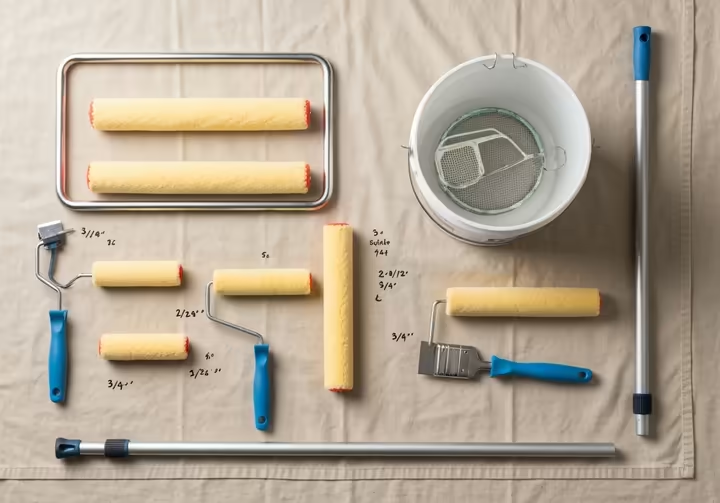
Getting a pro paint finish isn't about the paint, it's about the tools. A paint roller is a whole system, not just a fuzzy stick. Picking the right parts is your first step to walls that don't look like you painted them yourself.
The Frame: It's All in the Bones
The roller frame is the handle, metal rod, and rotating cage that holds the roller cover. 1, 2 Don't grab the cheapest one. Cheap frames often flex, causing the roller to skid instead of roll smoothly, while pro models are built for comfort and a better finish. 2, 3

The big difference is the rolling mechanism. A standard frame just spins on an axle, which can get sticky. 2 A quality frame uses internal ball bearings to reduce friction, letting the cage spin with a smooth, fluid motion. 5
This smooth roll both feels better and directly improves the paint finish. It helps make up for any wobbly-handedness, preventing the skips and stutters that scream "amateur". 1 It mechanically smooths out inconsistencies in your technique, closing the gap between your work and a pro's.
The Cover (or Nap): The Fuzzy Part
The roller cover, or nap, is the part that holds and applies the paint. The "nap" is the length of the fibers. The rule is simple: the smoother the wall, the shorter the nap. 7
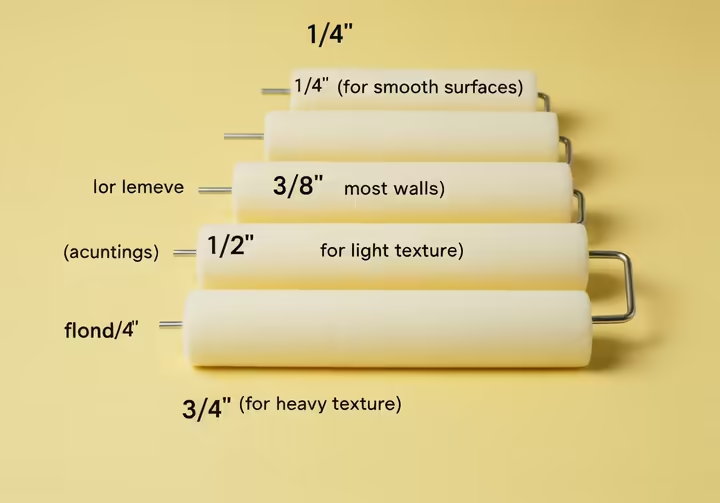
For a smooth drywall surface, use a short nap of 1/4-inch or 3/8-inch. 9 The short fibers apply a thin, controlled film of paint without adding their own texture. 11 Using a long-napped roller on a smooth wall is a classic mistake that leaves a textured "orange peel" effect. 13
For textured surfaces like brick or stucco, you need a longer nap of 1/2-inch, 3/4-inch, or more.[7, 15] The long fibers act like tiny fingers, reaching into all the nooks and crannies to deposit paint. 13 For most DIYers, a 3/8-inch nap is the sweet spot, as its slight texture can hide minor wall imperfections. 13
The cover's material also has to match the paint. For today's latex or water-based paints, use synthetic covers made of nylon or polyester. 17 For oil-based paints and varnishes, natural fibers like lambswool or mohair are the way to go. 17 Microfiber covers are a newer option that holds more paint and gives an exceptionally smooth, spray-like finish. 16
Finally, look at the construction. Woven covers (like microfiber) are highly shed-resistant, which is crucial for glossy paints where lint would stand out. 7 Knit covers (like polyester) hold more paint for faster work but can leave a slight texture, making them better for flat or matte finishes. 7
| Surface Texture | Example Surfaces | Recommended Nap Length | Why it Works | Best For Paint Sheen |
|---|---|---|---|---|
| Ultra-Smooth | Metal Doors, Cabinets, Sanded Wood | $3/16$-inch - 1/4-inch | Applies a very thin, even film without adding texture, mimicking a spray finish. | High-Gloss, Semi-Gloss |
| Smooth | New or Skim-Coated Drywall, Smooth Plaster | $1/4$-inch - 3/8-inch | Provides a smooth finish with minimal stipple. The `3/8-inch nap helps hide minor flaws. | Semi-Gloss, Eggshell, Satin |
| Lightly Textured | Older Drywall, Light Orange Peel Texture | $3/8$-inch - 1/2-inch | Balances smooth application with enough fiber length to cover light texture evenly. | Eggshell, Satin, Matte |
| Rough | Stucco, Textured Plaster, Brick, Concrete | $1/2$-inch - 3/4-inch | Longer fibers reach into the deep crevices of the texture to ensure complete coverage. | Matte, Flat |
| Very Rough | Cinder Block, Heavily Textured Stucco | $1$-inch - 11/2-inch | Maximum fiber length holds a large volume of paint to fill highly porous and irregular surfaces. | Flat |
Accessories: The Game Changers
Get an extension pole. Seriously. It's not optional. 21 Without one, you're constantly bending over to get paint and climbing ladders to reach high spots. 21 A pole lets you stand comfortably, reduces strain on your body, and gives you a better view of your work. 23, 25 Most importantly, it allows you to make the long, continuous floor-to-ceiling strokes needed for a perfect finish. 21

Ditch the paint tray. Pros see them as flimsy, tippy, and inefficient. 26 Instead, use a 5-gallon bucket with a metal or plastic paint screen hooked to the side. 26, 28 A bucket is stable, holds a gallon or more of paint, and when paired with an extension pole, lets you reload without bending over. 22, 26 This bucket-and-pole system is a professional workflow that turns painting from a clunky chore into a smooth, rhythmic process.
Pre-Game Prep: Getting the Roller Ready
Don't just grab a roller and go. A few minutes of prep will save you from a world of hurt (and ugly walls). These steps prevent the most common amateur mistakes and get your tools ready to perform.
De-Fuzzing: No Lint Allowed
New roller covers always have loose fibers from the factory, a problem called "shedding". 30 If you don't remove them, they'll get stuck in your wet paint, creating a gritty, lint-filled wall that's impossible to fix without sanding. 20 De-fuzzing a new roller is a critical step that prevents a lint-filled disaster.

The quickest way is the tape method: wrap the roller in painter's tape, sticky-side down, press firmly, and peel it off. 32, 34 Repeat until the tape comes off clean. The wash method is more thorough: wash the cover in warm, soapy water to flush out loose fibers. 36 After washing, you must remove all excess water by shaking it out or using a roller spinner until it's just damp. 36
Loading Up: Getting Paint on the Roller
The goal is to get the roller cover fully and evenly saturated with paint, right down to the core, without it dripping. 31 Pour paint into the deep well of your tray, filling it no more than halfway. 38 Lightly dip the roller into the paint, then roll it back and forth on the tray's ribbed ramp. 39, 40 This rolling action forces paint into the fibers. 38
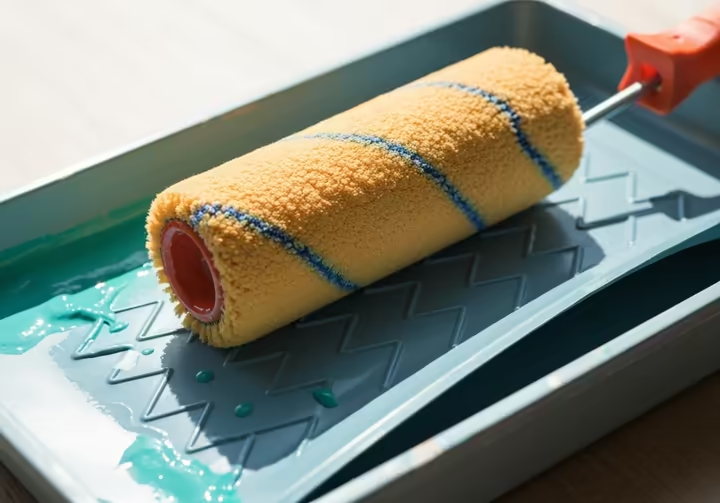
Repeat this dip-and-roll process several times until the cover is fully "charged". 42 A perfectly loaded roller looks plump and evenly coated, but not shiny or drippy. 31, 45 Over-loading leads to drips and smears, while under-loading ("dry rolling") forces you to press too hard, causing streaks and a patchy finish. 47, 49, 51
The Main Event: Rolling Like a Pro
Okay, tools are prepped. Time to paint. This isn't random... it's a three-step dance to get a perfect, seamless finish. The whole technique is designed to create a single, uniform film of color.
The Wet Edge: Your Golden Rule
The most important rule in painting is to maintain a "wet edge". 53 This means you always blend your next roller stroke into the area you just painted while it's still wet. 15 If you roll fresh paint over a section that has started to dry, you'll create a visible "lap mark", an ugly line or streak where the layers overlapped. 54 To avoid this, work quickly in manageable sections, about three or four feet square. 53
The "W" Move: Getting Paint on the Wall
With a fully loaded roller, start in the center of a dry section of the wall. Roll a large "W," "M," or "N" shape onto the wall. 15 This isn't for decoration, it's a technique to quickly spread out that big initial load of paint over a wide area without creating a single heavy, drippy stripe. 59
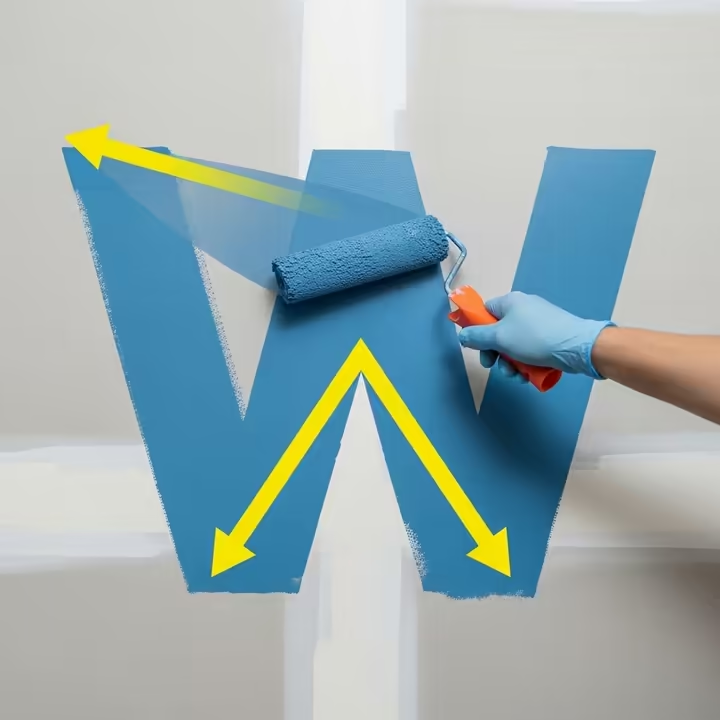
Spreading and Smoothing: The Final Touch
After making the "W," fill in the pattern using even, parallel strokes, without lifting the roller from the wall. 45 This is called "cross-rolling" and it spreads the paint evenly in all directions. 61
The final, most important step is "laying off". 63 While the section is still wet, make a series of light, continuous, overlapping strokes in a single direction, usually top to bottom. 15 Use a nearly empty roller and very little pressure, just letting it glide over the surface. 63 This finishing pass erases all marks, aligns the texture, and leaves behind a single, flawless sheet of color. 63
Easy Does It: Pressure and Speed
Don't push hard on the roller. A common mistake is to try and "squeeze" out the last bit of paint. 51 A properly loaded roller needs very little pressure, the weight of the tool should do the work. 46 Pushing too hard creates thick ridges of paint called "fat edges" and is a clear sign that you need to reload your roller. 31
Uh-Oh... Common Painting Problems (and Fixes)
Things go wrong. It happens. Instead of panicking, learn to read the wall. Every flaw tells you what mistake you made, which is the key to getting better.

Roller Marks or Lap Lines
These are visible streaks or bands where one roller pass overlapped another. 54 The cause is almost always failing to maintain a wet edge. 15 Other causes are pushing too hard or trying to stretch a dry roller too far. 68 To fix them, you have to sand the entire wall smooth, clean it, and repaint using the correct technique. 69
Excessive Stipple ("Orange Peel")
This is a bumpy, overly-textured finish that looks like the skin of an orange. 71 The main cause is using a roller nap that's too long for a smooth wall. 71 It can also be caused by low-quality paint or applying the paint too thickly. 68 The fix is the same: sand the surface smooth, clean it, and repaint with the correct, shorter-nap roller. 70
Paint Splatter
Tiny droplets of paint flying off the roller are usually caused by rolling too fast. 74 The speed creates a centrifugal force that flings paint everywhere. Overloading the roller or using a cheap cover that can't hold paint properly are also common culprits. 74 The solution is to slow down, load your roller correctly, and use high-quality covers designed to reduce spatter. 75
The Cleanup: Don't Skip This Part
The job isn't done 'til the tools are clean. A professional approach includes meticulous cleanup. Taking care of good tools is an investment that saves you money and is better for the planet.
Cleaning Roller Covers for Reuse
High-quality roller covers are meant to be washed and reused, unlike cheap cardboard-core covers. 10 Start cleaning immediately after painting. First, scrape as much excess paint as possible back into the can using the curved edge of a 5-in-1 tool. 76

Next, take the cover off the frame and wash it in a bucket of warm, soapy water. 78 Use your hands to work the soap deep into the fibers and squeeze the paint out. Rinse the cover under clean, running water until the water runs completely clear. 76
Drying is key. A roller spinner is a great tool that uses centrifugal force to fling the cover nearly dry in seconds. 81, 83 Without a spinner, shake the cover out well to remove as much water as possible. Then stand it on its end to air dry, never lay it flat, which will crush the fibers. 77
Cleaning Frames, Trays, and Buckets
Don't forget the other parts. Clean the roller frame with a stiff brush and soapy water, making sure the cage still spins freely. 76 If you used a paint tray, hopefully you used a disposable liner. 26 If not, wash it thoroughly, along with your 5-gallon bucket and paint screen.
Level Up: Advanced Roller Techniques
Ready for the big leagues? Mastery means adapting your tools and techniques for trickier situations. Here's how to handle challenging surfaces and unforgiving paints.
Back-Rolling After Spraying
When paint is applied with a sprayer, it can sit on top of the surface without bonding well. 84 "Back-rolling" is the technique of rolling over a freshly sprayed (and still wet) surface with a lightly loaded roller. 86 This both pushes the paint into the surface for a stronger bond and adds a slight texture, which makes future touch-ups much easier to blend. 85
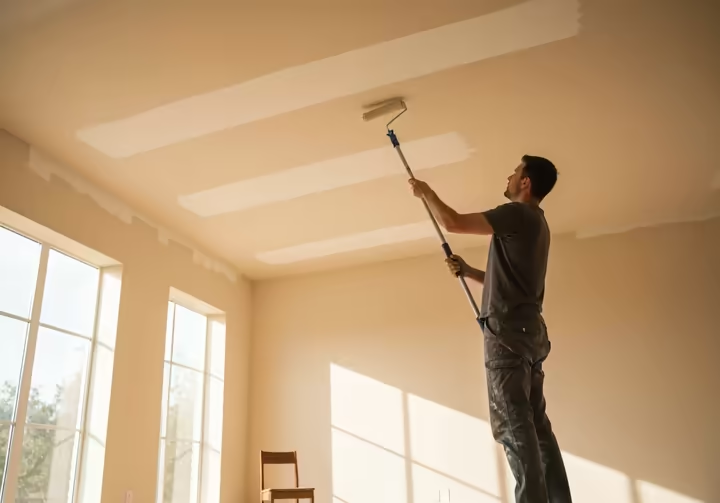
Painting Ceilings: Defying Gravity
An extension pole is absolutely necessary for painting ceilings. 21 The trick to a streak-free ceiling is a perfect laying-off pass. 66 All your final strokes, for the entire ceiling, must be rolled in the same direction. 65 That direction should be parallel to the main light source (like a big window) to hide any potential lap marks. Using a high-quality, very flat ceiling paint also helps hide minor imperfections. 56
Glossy Paint: The Final Boss
The sheen of a paint dramatically affects your technique. Low-sheen paints like matte and eggshell are forgiving because their dull surface hides flaws. 16 High-sheen paints like semi-gloss act like a mirror, highlighting every speck of dust, roller mark, or stray fiber. 19 As the gloss level goes up, the need for perfection goes way up.
Applying a high-gloss finish requires perfect technique. Use a very short-nap (1/4-inch or less) woven or foam roller to minimize texture and eliminate shedding. 20 Your application must be flawless, with perfect wet-edge management and a delicate, uniform laying-off pass to create a glass-smooth surface. 90
Rough Surfaces: Concrete and Stucco
Applying paint to rough, porous surfaces like stucco or concrete block requires a change in tools and technique. 92 You'll need a long-nap roller cover, from 3/4-inch to 1 1/2-inch, to hold a large volume of paint and force it into every nook and cranny. 92 These surfaces are also very "thirsty" and absorb a lot of paint, so plan on using a dedicated primer and at least two topcoats. You may also need to apply a fair amount of pressure to work the paint fully into the deep texture. 92, 94
Playing It Safe
A good paint job doesn't involve a trip to the emergency room. Painting is physical work, so smart practices prevent injury, reduce fatigue, and lead to a better result. A safe project is a successful project.
Save Your Back
Painting involves a lot of repetitive motion. 21 The best tool for your body is the extension pole. 25 It lets you work from the ground with a good posture, reducing strain on your back, neck, and shoulders. 24 When you're not in pain, you can focus on doing better, more consistent work.
Breathe Easy: Ventilation
Even low-VOC paints release vapors. Always make sure your workspace is well-ventilated. Open windows and doors to create a cross-breeze. Fans can help circulate air, but don't point them directly at the wet wall, as it can cause the paint to dry too fast and create lap marks. 47
Getting Rid of Leftovers
Proper disposal of leftover materials is part of the job. Liquid paints and solvents are often considered Household Hazardous Waste (HHW) and need to be handled according to local rules. 95 Never pour liquid paint down a drain or put it in the regular trash. 96
For small amounts of latex (water-based) paint, you can leave the can open to let the paint dry into a solid block, you can add cat litter or sawdust to speed this up. 96 Once solid, it can usually go in the regular trash with the lid off. 96 Oil-based paints and solvents are more toxic and almost always must be taken to a designated HHW collection facility for safe disposal. 95, 96
Works cited
- How to Choose the Best Handle/Frame for a Paint Roller, https://www.cohwabrush.com/news/how-to-choose-the-best-handle-frame-for-a-paint-roller.html
- Paint roller frame is basically a comfortable plastic handle connected to a roller cage., https://eaglemall2u.com/paint-roller-frames
- House Painters Pro Tips: Roller Frames & Covers - ImageWorks Painting Inc, https://www.imageworkspainting.com/blog/house-painters-pro-tips-roller-frames-covers
- The Best Paint Rollers and Covers - Tested by Bob Vila, https://www.bobvila.com/articles/best-paint-roller/
- Understanding Bearing Cages: Types, Design & Applications - NBC, https://www.nbcbearings.com/understanding-bearing-cages-types-design-applications/
- Roller Bearings vs. Ball Bearings: What's the Difference? - Pacific International Bearing, https://pibsales.com/bearings/roller-bearings-vs-ball-bearings/
- How to Choose a Paint Roller Cover | Purdy®, https://www.purdy.com/en/painting-resources/painting-faqs/how-to-choose-a-roller-cover
- Ultimate Paint Roller Nap Guide to Choose the Right Cover - ThePaintStore.com, https://thepaintstore.com/blogs/news/the-ultimate-paint-roller-nap-guide-choose-the-right-cover-for-your-project
- www.purdy.com, https://www.purdy.com/en/painting-resources/painting-faqs/how-to-choose-a-roller-cover#:~:text=Nap%20Size%20Depends%20on%20surface%20and%20desired%20smoothness.&text=For%20uniform%20interior%20surfaces%20like,to%20ensure%20a%20smooth%20finish.
- The Best Paint Rollers For Your Paint Projects - Benjamin Moore, https://www.benjaminmoore.com/en-us/interior-exterior-paints-stains/how-to-advice/painting-101/choosing-paint-roller-covers
- Which Roller Cover Should I Use?! - Home Theory Design + Renovation, https://hometheoryliving.com/which-roller-cover-do-i-use/
- Choosing the Right Paint Roller: Understanding Nap Length and Surface Texture, https://hamiltonsbrush.co.za/choosing-the-right-paint-roller-understanding-nap-length-and-surface-texture/
- What is the Best Paint Roller for Your Paint Project? | Glidden, https://www.glidden.com/advice/what-is-the-best-paint-roller-for-your-pain
- How To Match A Roller Cover To Surface - The Wooster Brush Company, https://www.woosterbrush.com/product-knowledge/how-to-match-roller-cover-to-surface/
- How to Choose a Good Paint Roller - This Old House, https://www.thisoldhouse.com/painting/21215440/how-to-choose-a-good-paint-roller
- Choosing the Right Roller For The Job - Aboff's Paints, https://aboffs.com/blogs/resources/choosing-the-right-roller-for-the-job
- Selecting Brushes & Rollers - Sherwin-Williams, https://www.sherwin-williams.com/home-builders/products/resources/pro-tips/sw-article-pro-brushesrollers
- Discover What Rollers Professional Painters Use for Perfect Results! - ESP Painting, https://esppainting.com/what-rollers-do-professional-painters-use/
- How to Choose a Paint Roller Cover - Benjamin Moore, https://www.benjaminmoore.com/en-ca/interior-exterior-paints-stains/how-to-advice/painting-101/choosing-paint-roller-covers
- How To Choose The Right Roller Cover - The Wooster Brush Company, https://www.woosterbrush.com/product-knowledge/how-to-choose-the-right-roller-cover/
- K brand paint extension pole to be one of the critical interior painting tools, https://www.gsbpainttools.com/news/paint%20extension%20pole.html
- Painting more enjoyable? - DoItYourself.com Community Forums, https://www.doityourself.com/forum/painting-staining-all-interior-exterior-surfaces/307037-painting-more-enjoyable.html
- Why use a Paint Extension Pole - Langley Painters | Abbott Painters, https://painterslangley.com/content/practical-painting-tips/53/why-use-a-paint-extension-pole
- Pro Tips for Avoiding Neck Shoulder and Back Strain While Painting, https://www.lightmenpainting.com/blog/avoiding-neck-and-shoulder-strain-while-painting
- Paint Pals » Essential Guide to Extension Poles for Painting, https://www.thepaintpals.com/mastering-hard-to-reach-spaces-the-essential-guide-to-using-extension-poles-for-painting/
- The Best Paint Tray is a Paint Bucket | Paint Rolling Tips, https://www.imageworkspainting.com/blog/house-painters-pro-tips-paint-trays-buckets
- Rolling out of the 5 gallon. : r/paint - Reddit, https://www.reddit.com/r/paint/comments/1j93pzf/rolling_out_of_the_5_gallon/
- PRIVATE BRAND UNBRANDED Heavy Duty 5 gal. Metal Bucket Grid HD RM 416 H - The Home Depot, https://www.homedepot.com/p/Heavy-Duty-5-gal-Metal-Bucket-Grid-HD-RM-416-H/309628524
- How to Paint Quickly and More Evenly with a Roller - YouTube, https://www.youtube.com/watch?v=OSFsjqOdUZE
- Help! New paint roller deposited little fiber pubes on my freshly sanded wall. - Reddit, https://www.reddit.com/r/HomeImprovement/comments/9jxqh5/help_new_paint_roller_deposited_little_fiber/
- How To Paint With A Roller Like A Pro - New Life Painting, https://newlifepainting.com/blog/how-to-paint-with-a-roller-like-a-pro/
- How to Clean Fuzz Off of a New Paint Roller - YouTube, https://www.youtube.com/watch?v=7MpqOFrcWJM
- Make sure that before you paint anything, that you are removing all th... - TikTok, https://www.tiktok.com/@comestayawhile/video/7353350148900130091
- If you tape your roller cover and pull it off it will take all the extra fuzzies. The fuzzies will stick to the tape instead of the walls :) : r/paint - Reddit, https://www.reddit.com/r/paint/comments/emt21e/if_you_tape_your_roller_cover_and_pull_it_off_it/
- How to Remove Lint from a Roller Cover | Dunn-Edwards Paints, https://www.dunnedwards.com/explore/how-to/videos/how-to-remove-lint-from-a-roller-cover/
- Fuzz/lint on new paint rollers - DoItYourself.com Community Forums, https://www.doityourself.com/forum/painting-staining-all-interior-exterior-surfaces/55863-fuzz-lint-new-paint-rollers.html
- How to Clean & Maintain Paint Brushes & Rollers | Monarch, https://monarchpainting.com.au/how-to-guides/care-and-maintain/
- How To Load A Roller Cover - Wooster Brush, https://www.woosterbrush.com/product-knowledge/how-to-load-a-roller-cover/
- How To Use A Paint Roller - Dipping The Paint Roller - Glidden, https://www.glidden.com/advice/how-to-use-a-paint-roller-dipping-the-paint
- The technique use to load a roller for applying painting. - YouTube, https://www.youtube.com/watch?v=s4BY7qPV3PM
- 10 Paint Roller Techniques and Tips for Perfect Walls | Family ..., https://www.familyhandyman.com/list/paint-roller-techniques-tips/
- When painting with a roller sometimes it feels uneven, like the cross-section is an oval rather than a circle. What am I doing wrong? - Home Improvement Stack Exchange, https://diy.stackexchange.com/questions/187546/when-painting-with-a-roller-sometimes-it-feels-uneven-like-the-cross-section-is
- How To Use A Paint Roller - Ace Hardware - YouTube, https://www.youtube.com/watch?v=UuqdTiSHKII&pp=0gcJCfwAo7VqN5tD
- How professional painters load their rollers - YouTube, https://www.youtube.com/watch?v=C-9KD9lcmUI&pp=0gcJCf8Ao7VqN5tD
- How to Use a Paint Roller | HowStuffWorks, https://home.howstuffworks.com/home-improvement/home-diy/painting/how-to-use-a-paint-roller.htm
- How-to Paint Interiors with a Brush and Roller | Behr, https://www.behr.com/consumer/how-to/interior/how-to-load-a-brush-and-roller
- Common interior painting mistakes and how to avoid them - Avello Group, https://www.avello.com.au/blog/common-interior-painting-mistakes-and-how-to-avoid-them
- 7 Mistakes When Painting - Prep & Don't Overload Brush, https://franklinpainting.com/blog/want-a-better-paint-job-avoid-these-7-mistakes/
- Why does my painting SUCK? 4th coat. What am I doing wrong? : r/DIYUK - Reddit, https://www.reddit.com/r/DIYUK/comments/wwezkj/why_does_my_painting_suck_4th_coat_what_am_i/
- Roller marks visible after painting, what should I do? - Reddit, https://www.reddit.com/r/paint/comments/16qtm4m/roller_marks_visible_after_painting_what_should_i/
- LPT: if you are applying any amount of pressure, then you need more paint on the roller. It's like a sponge that you dont wring out. : r/LifeProTips - Reddit, https://www.reddit.com/r/LifeProTips/comments/nyj1xp/lpt_if_you_are_applying_any_amount_of_pressure/
- Keeping A Wet Edge While Rolling A Wall. Proper Paint Rolling. How to roll a wall. - YouTube, https://www.youtube.com/watch?v=syTQON7Lyr8
- Keep a Wet Edge Up the Full Height of the Wall - Paints on Wheel, https://paintsonwheel.com/tips/keep-a-wet-edge-up-the-full-height-of-the-wall/
- Avoid Lap Marks By Maintaining a "Wet Edge" | Benjamin Moore, https://www.benjaminmoore.com/en-ca/contractors/job-solutions/troubleshooting/lap-marks
- STOP Lap Marks. Tips PRO's Use To Paint Perfect Walls. - YouTube, https://www.youtube.com/watch?v=Zh9I5HrYadA
- Avoid Lap Marks By Maintaining a "Wet Edge" | Benjamin Moore, https://www.benjaminmoore.com/en-us/contractors/job-solutions/troubleshooting/lap-marks
- How to Avoid Common Painting Mistakes | Sherwin-Williams, https://www.sherwin-williams.com/en-us/project-center/paint/how-to-avoid-painting-mistakes
- How to Paint Walls (Rolling the "W") | Glidden, https://www.glidden.com/advice/how-to-paint-walls-rolling-the-w
- Painting w/Aura: still do 'W' pattern and sweep ceiling to floor? - Houzz, https://www.houzz.com/discussions/2491874/painting-w-aura-still-do-w-pattern-and-sweep-ceiling-to-floor
- Using the W Method to Roll Paint - YouTube, https://www.youtube.com/watch?v=aIGx1QwSeKY
- How to Paint a Wall Evenly | Beginners Tips | 60 Second DIY ..., https://www.youtube.com/watch?v=ORLSrVc5QHw
- Proper rolling technique to get good paint coverage while avoiding lines? - Reddit, https://www.reddit.com/r/HomeImprovement/comments/wzt856/proper_rolling_technique_to_get_good_paint/
- Super Quick Lesson: How to roll a wall with paint - YouTube, https://www.youtube.com/watch?v=snJ8kwcNTqE
- Laying Off Techniques with a Paint Brush | Hamilton Decorating Tools UK, https://www.hamiltondecoratingtools.co.uk/knowledge-room/guides/laying-off-brushes-techniques-and-uses/
- How to roll Ceilings no roller marks or streaks. - YouTube, https://www.youtube.com/watch?v=7uYMSxBh_Ro
- Super Quick Lesson: How to roll a ceiling with paint - YouTube, https://www.youtube.com/watch?v=5nCBEtClF9g
- Purdy® | How To Use A Paint Roller - YouTube, https://www.youtube.com/watch?v=TiN1ELy0nag
- Roller Marks, Brush Marks and Stippling - Sherwin-Williams, https://www.sherwin-williams.com/en-us/project-center/maintenance-repair/how-to-fix-brush-marks-stippling
- Lap marks : r/paint - Reddit, https://www.reddit.com/r/paint/comments/1gkla8d/lap_marks/
- How To Fix Roller Marks or Excessive Stipple In Paint - ppgpaints.com, https://www.ppgpaints.com/pro/pro-painting-tips/how-to-fix-roller-marks-or-excessive-stipple-in-pa
- Stipple / Roller Marks | JC Licht, https://jclicht.com/blogs/our-blog/stipple-roller-marks
- Roller Marks "Stipple" - Problem Solver - Rodda Paint, https://www.roddapaint.com/problem-solver/roller-marks-stipple/
- How to Fix Roller Marks / Stipple Problems - Dulux Trade, https://www.duluxtrade.com.au/technical-advice/professional-painter-problem-solver/interior/rollermarks-stipple/
- How to Fix Roller Spattering Problems | Dulux, https://www.duluxtrade.com.au/technical-advice/professional-painter-problem-solver/interior/roller-spattering/
- How to Avoid Roller Splattering | Sherwin-Williams, https://www.sherwin-williams.com/en-us/project-center/maintenance-repair/how-to-avoid-roller-splattering
- How to Clean Paint Brushes and Rollers to Last Longer - Real Simple, https://www.realsimple.com/home-organizing/home-improvement/painting/how-to-clean-paint-brushes
- How to Clean Paint Rollers the Right Way: Pro Tips That Save Time ..., https://tribblepainting.com/how-to-clean-paint-rollers/
- www.realsimple.com, https://www.realsimple.com/home-organizing/home-improvement/painting/how-to-clean-paint-brushes#:~:text=Remove%20the%20roller%20cover%20from,t%20start%20to%20suds%20up.
- Lengthen the Life of Your Paint Tools - MARSHALLTOWN®, https://marshalltown.com/blog/how-to-clean-and-store-paint-rollers-and-trays
- How to Clean & Store Paint Rollers | Benjamin Moore - YouTube, https://www.youtube.com/watch?v=TofTEAMlqTY
- Cleaning rollers : r/paint - Reddit, https://www.reddit.com/r/paint/comments/s9n8e7/cleaning_rollers/
- How to Clean Paint Rollers: the Quick, the Neat, and the Lazy Way ..., https://www.bradthepainter.com/how-to-clean-paint-rollers/
- This paint roller cleaning gadget is a must have #alecpaints - YouTube, https://www.youtube.com/shorts/S6zCZpk4mN0
- To Back Roll or Not To Back Roll? - The Idaho Painter, https://www.idahopainter.com/to-back-roll-or-not-to-back-roll
- Backroll After Paint Spraying: The Key to a Flawless Finish - PaintAccess., https://www.paintaccess.com.au/blogs/company-news/backroll-after-paint-spraying-the-key-to-a-flawless-finish
- Spray Painting and Back Rolling | Dulux - Dulux Trade, https://www.duluxtrade.co.nz/technical-advice/application/spray-painting-and-back-rolling/
- When and Why to Back-Roll After Paint Spraying - Titan Tool, https://www.titantool.com/blog/when-and-why-to-back-roll-after-paint-spraying
- shop.haymespaint.com.au, https://shop.haymespaint.com.au/how-to-paint-a-large-ceiling-without-streaks
- Painting: 1/4” vs 3/8” NAP roller : r/HomeImprovement - Reddit, https://www.reddit.com/r/HomeImprovement/comments/10lk5bw/painting_14_vs_38_nap_roller/
- How to get a smooth gloss finish when painting with a paint roller, https://stoproll.co.uk/how-to-get-a-smooth-gloss-finish-with-a-paint-roller/
- How To Roll-Paint a Wall Like a Pro - This Old House, https://www.thisoldhouse.com/painting/21019399/how-to-roll-paint-onto-a-wall
- How To Paint Exterior Stucco, Some Helpful Tips - The Stucco Guy, https://thestuccoguy.com/how-to-paint-exterior-plaster-some-helpful-tips/
- How to paint cement rendered walls using a roller. - YouTube, https://www.youtube.com/watch?v=TuWA-hMpbn8
- How to paint stucco. The Best Way To Paint Stucco. How to paint a house - YouTube, https://www.youtube.com/watch?v=tUFBv9At12c
- Household Hazardous Waste (HHW) | US EPA, https://www.epa.gov/hw/household-hazardous-waste-hhw
- Paint Disposal Guide — the Green Project, https://www.thegreenproject.org/paint-disposal
- Hazardous Waste - City and County of Denver, https://denvergov.org/Government/Agencies-Departments-Offices/Agencies-Departments-Offices-Directory/Recycle-Compost-Trash/Additional-Services/Hazardous-Waste